CentOS 5安装ISPConfig 3主机控制面板详细教程
ISPConfig 3是Linux的一个开源主机控制面板。ISPConfig 3能够通过一个控制面板管理多台服务器。
服务与功能
- 单个控制面板管理一台或更多的服务器(多服务器管理)
- 不同的权限极别(管理员,代理商,客户)+roudcube插件为ISPConfig提供的电子邮件用户极别
- Httpd(虚拟主机,基于域名和IP)
- FTP,SFTP,SCP
- DNS(A, CNAME, MX, SRV和TXT记录 )
- POP3,IMAP
- Email-Autoresponder
- 服务器邮件过滤
- 高级的email spamfilter和antivirus filter邮件过滤软件
- MySQL client-databases
- Webalizer statistics
- 硬盘配额
- 邮件配额
- 流量限制和统计
- 多IP支持
- SSL
- SSI
- PHP (可用的PHP模块: mod_php, FCGI,CGI和SuPHP)
- Shell-access
- Jailed shell access
- 防火墙
- 服务器监控模块
- phpmyadmin MySQL数据库客户端
现在我们开始安装ISPConfig 3。
在安装之前,我们需要禁用Iptables和SELinux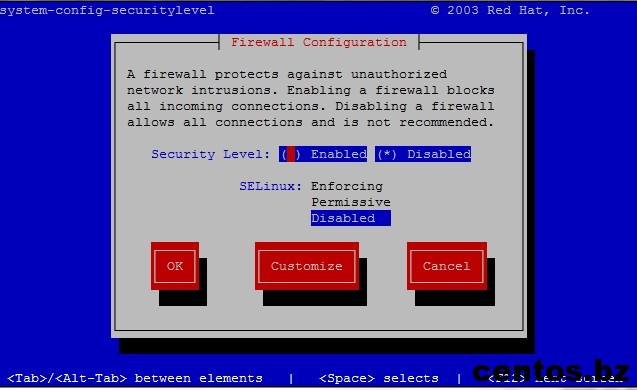
如果提示命令不存在,则表示没有安装system-config-securitylevel,执行yum install system-config-securitylevel命令安装即可。
安装一些软件
- rpm --import /etc/pki/rpm-gpg/RPM-GPG-KEY*
- yum update
- yum groupinstall 'Development Tools'
- yum groupinstall 'Development Libraries'
安装Quota
- yum install quota
编辑/etc/fstab,添加,usrquota,grpquota 到/ partition(/dev/VolGroup00/LogVo100)后面,添加后如下:
- /dev/VolGroup00/LogVol00 / ext3 defaults,usrquota,grpquota 1 1
- LABEL=/boot /boot ext3 defaults 1 2
- tmpfs /dev/shm tmpfs defaults 0 0
- devpts /dev/pts devpts gid=5,mode=620 0 0
- sysfs /sys sysfs defaults 0 0
- proc /proc proc defaults 0 0
- /dev/VolGroup00/LogVol01 swap swap defaults 0 0
然后运行如下命令启用quota:
- touch /aquota.user /aquota.group
- chmod 600 /aquota.*
- mount -o remount /
- quotacheck -avugm
- quotaon -avug
注意:这种设置可能不适合VPS。
安装Apache, MySQL, phpMyAdmin
- rpm --import http://dag.wieers.com/rpm/packages/RPM-GPG-KEY.dag.txt
- cd /tmp
- wget http://pkgs.repoforge.org/rpmforge-release/rpmforge-release-0.5.2-2.el5.rf.i386.rpm
- rpm -Uvh rpmforge-release-0.5.2-2.el5.rf.i386.rpm
- yum install ntp httpd mysql-server php php-mysql php-mbstring php-mcrypt phpmyadmin rpm-build gcc mysql-devel openssl-devel cyrus-sasl-devel pkgconfig zlib-devel pcre-devel openldap-devel postgresql-devel expect libtool-ltdl-devel openldap-servers libtool gdbm-devel pam-devel gamin-devel
安装Courier-IMAP, Courier-Authlib和Maildrop
- useradd -m -s /bin/bash compileuser
- passwd compileuser
- visudo
按如下编辑
- [...]
- root ALL=(ALL) ALL
- compileuser ALL=(ALL) ALL
- [...]
- su compileuser
- mkdir $HOME/rpm
- mkdir $HOME/rpm/SOURCES
- mkdir $HOME/rpm/SPECS
- mkdir $HOME/rpm/BUILD
- mkdir $HOME/rpm/SRPMS
- mkdir $HOME/rpm/RPMS
- mkdir $HOME/rpm/RPMS/i386
- echo "%_topdir $HOME/rpm" >> $HOME/.rpmmacros
- cd /tmp
- wget http://nchc.dl.sourceforge.net/project/courier/authlib/0.63.0/courier-authlib-0.63.0.tar.bz2
- wget http://nchc.dl.sourceforge.net/project/courier/imap/4.9.3/courier-imap-4.9.3.tar.bz2
- wget http://nchc.dl.sourceforge.net/project/courier/maildrop/2.5.4/maildrop-2.5.4.tar.bz2
- sudo rpmbuild -ta courier-authlib-0.63.0.tar.bz2
- cd $HOME/rpm/RPMS/i386
- sudo rpm -ivh courier-authlib-0.63.0-1.i386.rpm courier-authlib-mysql-0.63.0-1.i386.rpm courier-authlib-devel-0.63.0-1.i386.rpm
- cd /tmp
- rpmbuild -ta courier-imap-4.9.3.tar.bz2
- cd $HOME/rpm/RPMS/i386
- sudo rpm -ivh courier-imap-4.9.3-1.i386.rpm
- cd /tmp
- sudo rpmbuild -ta maildrop-2.5.4.tar.bz2
- cd $HOME/rpm/RPMS/i386
- sudo rpm -ivh maildrop-2.5.4-1.i386.rpm
- exit
安装Postfix
- yum install postfix
- chkconfig --levels 235 courier-authlib on
- /etc/init.d/courier-authlib start
- chkconfig --levels 235 sendmail off
- chkconfig --levels 235 postfix on
- chkconfig --levels 235 saslauthd on
- /etc/init.d/sendmail stop
- /etc/init.d/postfix start
- /etc/init.d/saslauthd restart
配置Courier
- chkconfig --levels 235 courier-imap on
- /etc/init.d/courier-authlib restart
- /etc/init.d/courier-imap restart
- cd /usr/lib/courier-imap/share/
- rm -f imapd.pem
- rm -f pop3d.pem
- vi /usr/lib/courier-imap/etc/imapd.cnf
最后编辑结果如下:
- [...]
- CN=server1.example.com
- [...]
- vi /usr/lib/courier-imap/etc/pop3d.cnf
最后编辑结果如下:
- [...]
- CN=server1.example.com
- [...]
- ./mkimapdcert
- ./mkpop3dcert
- /etc/init.d/courier-authlib restart
- /etc/init.d/courier-imap restart
安装getmail
- yum install getmail
设置MySQL密码和配置phpMyAdmin
- chkconfig --levels 235 mysqld on
- /etc/init.d/mysqld start
- mysqladmin -u root password yourrootsqlpassword
- mysqladmin -h server1.example.com -u root password yourrootsqlpassword
- vi /etc/httpd/conf.d/phpmyadmin.conf
修改结果如下:
- #
- # Web application to manage MySQL
- #
- #
- # Order Deny,Allow
- # Deny from all
- # Allow from 127.0.0.1
- #
- Alias /phpmyadmin /usr/share/phpmyadmin
- Alias /phpMyAdmin /usr/share/phpmyadmin
- Alias /mysqladmin /usr/share/phpmyadmin
- vi /usr/share/phpmyadmin/config.inc.php
修改结果如下:
- [...]
- /* Authentication type */
- $cfg['Servers'][$i]['auth_type'] = 'http';
- [...]
- chkconfig --levels 235 httpd on
- /etc/init.d/httpd start
安装Amavisd-new, SpamAssassin和ClamAV
- yum install amavisd-new spamassassin clamav clamd unzip bzip2 unrar perl-DBD-mysql
- chkconfig --levels 235 amavisd on
- chkconfig --levels 235 clamd on
- /usr/bin/freshclam
- /etc/init.d/amavisd start
- /etc/init.d/clamd start
- mkdir /var/run/amavisd /var/spool/amavisd /var/spool/amavisd/tmp /var/spool/amavisd/db
- chown amavis /var/run/amavisd /var/spool/amavisd /var/spool/amavisd/tmp /var/spool/amavisd/db
安装Apache的组件mod_php, mod_fcgi/PHP5和suPHP
- cd /etc/yum.repos.d/
- wget http://centos.karan.org/kbsingh-CentOS-Extras.repo
- vi /etc/yum.repos.d/kbsingh-CentOS-Extras.repo
把enabled=0改为enabled=1。如下:
- [...]
- [kbs-CentOS-Testing]
- name=CentOS.Karan.Org-EL$releasever - Testing
- gpgcheck=0
- gpgkey=http://centos.karan.org/RPM-GPG-KEY-karan.org.txt
- enabled=1
- baseurl=http://centos.karan.org/el$releasever/extras/testing/$basearch/RPMS/
- yum install php php-devel php-gd php-imap php-ldap php-mysql php-odbc php-pear php-xml php-xmlrpc php-eaccelerator php-mbstring php-mcrypt php-mhash php-mssql php-snmp php-soap php-tidy curl curl-devel perl-libwww-perl ImageMagick libxml2 libxml2-devel mod_fcgid php-cli httpd-devel
- vi /etc/php.ini
编辑结果如下:
- [...]
- ;error_reporting = E_ALL
- error_reporting = E_ALL & ~E_NOTICE
- [...]
- cgi.fix_pathinfo = 1
- cd /tmp
- wget http://www.suphp.org/download/suphp-0.7.1.tar.gz
- tar xvfz suphp-0.7.1.tar.gz
- cd suphp-0.7.1/
- ./configure --prefix=/usr --sysconfdir=/etc --with-apr=/usr/bin/apr-1-config --with-apxs=/usr/sbin/apxs --with-apache-user=apache --with-setid-mode=owner --with-php=/usr/bin/php-cgi --with-logfile=/var/log/httpd/suphp_log --enable-SUPHP_USE_USERGROUP=yes
- make && make install
- vi /etc/httpd/conf.d/suphp.conf
加入如下行:
- LoadModule suphp_module modules/mod_suphp.so
- vi /etc/suphp.conf
加入如下代码:
- [global]
- ;Path to logfile
- logfile=/var/log/httpd/suphp.log
- ;Loglevel
- loglevel=info
- ;User Apache is running as
- webserver_user=apache
- ;Path all scripts have to be in
- docroot=/
- ;Path to chroot() to before executing script
- ;chroot=/mychroot
- ; Security options
- allow_file_group_writeable=true
- allow_file_others_writeable=false
- allow_directory_group_writeable=true
- allow_directory_others_writeable=false
- ;Check wheter script is within DOCUMENT_ROOT
- check_vhost_docroot=true
- ;Send minor error messages to browser
- errors_to_browser=false
- ;PATH environment variable
- env_path=/bin:/usr/bin
- ;Umask to set, specify in octal notation
- umask=0077
- ; Minimum UID
- min_uid=100
- ; Minimum GID
- min_gid=100
- [handlers]
- ;Handler for php-scripts
- x-httpd-suphp="php:/usr/bin/php-cgi"
- ;Handler for CGI-scripts
- x-suphp-cgi="execute:!self"
- /etc/init.d/httpd restart
编译安装Pure-FTPd
- cd /tmp
- wget http://download.pureftpd.org/pub/pure-ftpd/releases/pure-ftpd-1.0.32.tar.gz
- tar zxvf pure-ftpd-1.0.32.tar.gz
- cd pure-ftpd-1.0.32/
- ./configure --prefix=/opt/pureftpd \
- --with-mysql= \
- --with-paranoidmsg \
- --with-shadow \
- --with-welcomemsg \
- --with-uploadscript \
- --with-quotas \
- --with-cookie \
- --with-virtualhosts \
- --with-diraliases \
- --with-sysquotas \
- --with-ratios \
- --with-ftpwho \
- --with-throttling \
- --with-altlog \
- --with-language=simplified-chinese
- make && make install
- mkdir /etc/pure-ftpd
- cp pureftpd-mysql.conf /etc/pure-ftpd
- cp configuration-file/pure-ftpd.conf /etc/pure-ftpd
- cp configuration-file/pure-config.pl /etc
- vi /etc/init.d/pure-ftpd
加入如下代码:
- #!/bin/bash
- PATH=/bin:/sbin:/usr/bin:/usr/sbin:/usr/local/bin:/usr/local/sbin:~/bin
- export PATH
- # Check if user is root
- if [ $(id -u) != "0" ]; then
- printf "Error: You must be root to run this script!\n"
- exit 1
- fi
- prog="Pure-FTPd"
- PUREPIDFILE="/var/run/pure-ftpd.pid"
- PURECONFIGPL="/etc/pure-config.pl"
- PURECONFIGFILE="/etc/pure-ftpd/pure-ftpd.conf"
- start() {
- printf "Starting $prog... \n"
- $PURECONFIGPL $PURECONFIGFILE --daemonize
- }
- stop() {
- printf "Stopping $prog... \n"
- kill `cat $PUREPIDFILE`
- }
- status() {
- if [ -e $PUREPIDFILE ]; then
- printf "$prog is running.\n"
- else
- printf "$prog is NOT running.\n"
- fi
- }
- case "$1" in
- start)
- start
- ;;
- stop)
- stop
- ;;
- restart)
- stop
- start
- ;;
- status)
- status
- ;;
- *)
- printf "Usage: /root/pureftpd {start|stop|restart|status}\n"
- esac
- exit
- chmod 755 /etc/pure-config.pl
- ln -s /opt/pureftpd/sbin/pure-ftpd /usr/sbin/
- chmod 755 /etc/init.d/pure-ftpd
- chkconfig --levels 235 pure-ftpd on
- /etc/init.d/pure-ftpd start
安装MyDNS
- cd /tmp
- wget http://mydns.bboy.net/download/mydns-mysql-1.1.0-1.i386.rpm
- rpm -ivh mydns-mysql-1.1.0-1.i386.rpm
- vi /etc/init.d/mydns
编辑如下:
- [...]
- #chkconfig: 345 65 50
- [...]
- chkconfig --levels 235 mydns on
安装Vlogger And Webalizer
- yum install webalizer perl-DateTime-Format-HTTP perl-DateTime-Format-Builder
- wget http://n0rp.chemlab.org/vlogger/vlogger-1.3.tar.gz
- tar xvfz vlogger-1.3.tar.gz
- mv vlogger-1.3/vlogger /usr/sbin/
- rm -rf vlogger*
安装Jailkit
- cd /tmp
- wget http://olivier.sessink.nl/jailkit/jailkit-2.14.tar.gz
- tar xvfz jailkit-2.14.tar.gz
- cd jailkit-2.14
- ./configure
- make && make install
安装fail2ban
- yum install fail2ban
- chkconfig --levels 235 fail2ban on
- /etc/init.d/fail2ban start
安装rkhunter
- yum install rkhunter
安装SquirrelMail
- yum install squirrelmail
- /etc/init.d/httpd restart
- /usr/share/squirrelmail/config/conf.pl
按如下提示操作:
Main Menu —
1. Organization Preferences
2. Server Settings
3. Folder Defaults
4. General Options
5. Themes
6. Address Books
7. Message of the Day (MOTD)
8. Plugins
9. Database
10. Languages
D. Set pre-defined settings for specific IMAP servers
C Turn color off
S Save data
Q Quit
Command >>
SquirrelMail Configuration : Read: config.php
———————————————————
While we have been building SquirrelMail, we have discovered some
preferences that work better with some servers that don’t work so
well with others. If you select your IMAP server, this option will
set some pre-defined settings for that server.
Please note that you will still need to go through and make sure
everything is correct. This does not change everything. There are
only a few settings that this will change.
Please select your IMAP server:
bincimap = Binc IMAP server
courier = Courier IMAP server
cyrus = Cyrus IMAP server
dovecot = Dovecot Secure IMAP server
exchange = Microsoft Exchange IMAP server
hmailserver = hMailServer
macosx = Mac OS X Mailserver
mercury32 = Mercury/32
uw = University of Washington’s IMAP server
quit = Do not change anything
Command >>
imap_server_type = courier
default_folder_prefix = INBOX.
trash_folder = Trash
sent_folder = Sent
draft_folder = Drafts
show_prefix_option = false
default_sub_of_inbox = false
show_contain_subfolders_option = false
optional_delimiter = .
delete_folder = true
Press any key to continue…
SquirrelMail Configuration : Read: config.php (1.4.0)
———————————————————
Main Menu —
1. Organization Preferences
2. Server Settings
3. Folder Defaults
4. General Options
5. Themes
6. Address Books
7. Message of the Day (MOTD)
8. Plugins
9. Database
10. Languages
D. Set pre-defined settings for specific IMAP servers
C Turn color off
S Save data
Q Quit
Command >>
- vi /etc/squirrelmail/config_local.php
注释最后一行,如下:
- /**
- * Local config overrides.
- *
- * You can override the config.php settings here.
- * Don't do it unless you know what you're doing.
- * Use standard PHP syntax, see config.php for examples.
- *
- * @copyright © 2002-2006 The SquirrelMail Project Team
- * @license http://opensource.org/licenses/gpl-license.php GNU Public License
- * @version $Id: config_local.php,v 1.2 2006/07/11 03:33:47 wtogami Exp $
- * @package squirrelmail
- * @subpackage config
- */
- //$default_folder_prefix = '';
- ?>
安装ISPConfig 3
- cd /tmp
- wget http://downloads.sourceforge.net/project/ispconfig/ISPConfig%203/ISPConfig-3.0.3.3/ISPConfig-3.0.3.3.tar.gz?r=&ts=1309567938&use_mirror=nchc
- tar xvfz ISPConfig-3.0.3.3.tar.gz
- cd ispconfig3_install/install/
- php -q install.php
按如下提示操作:
——————————————————————————–
_____ ___________ _____ __ _
|_ _/ ___| ___ \ / __ \ / _(_)
| | \ `–.| |_/ / | / \/ ___ _ __ | |_ _ __ _
| | `–. \ __/ | | / _ \| ‘_ \| _| |/ _` |
_| |_/\__/ / | | \__/\ (_) | | | | | | | (_| |
\___/\____/\_| \____/\___/|_| |_|_| |_|\__, |
__/ |
|___/
——————————————————————————–
>> Initial configuration
Operating System: CentOS 5.2 or compatible
Following will be a few questions for primary configuration so be careful.
Default values are in [brackets] and can be accepted with
Tap in “quit” (without the quotes) to stop the installer.
Select language (en,de) [en]:
Installation mode (standard,expert) [standard]:
Full qualified hostname (FQDN) of the server, eg server1.domain.tld [server1.example.com]:
MySQL server hostname [localhost]:
MySQL root username [root]:
MySQL root password []:
MySQL charset [utf8]:
Generating a 2048 bit RSA private key
…………………………………………+++
………………………………………………………………………+++
writing new private key to ‘smtpd.key’
—–
You are about to be asked to enter information that will be incorporated
into your certificate request.
What you are about to enter is what is called a Distinguished Name or a DN.
There are quite a few fields but you can leave some blank
For some fields there will be a default value,
If you enter ‘.’, the field will be left blank.
—–
Country Name (2 letter coolcode) [GB]:
State or Province Name (full name) [Berkshire]:
Locality Name (eg, city) [Newbury]:
Organization Name (eg, company) [My Company Ltd]:
Organizational Unit Name (eg, section) []:
Common Name (eg, your name or your server’s hostname) []:
Email Address []:
Configuring Jailkit
Configuring SASL
Configuring PAM
Configuring Courier
Configuring Spamassassin
Configuring Amavisd
Configuring Getmail
Configuring Pureftpd
Configuring MyDNS
Configuring Apache
Configuring Firewall
Installing ISPConfig
ISPConfig Port [8080]:
Configuring DBServer
Installing Crontab
no crontab for root
no crontab for getmail
Restarting services …
Stopping MySQL: [ OK ]
Starting MySQL: [ OK ]
Shutting down postfix: [ OK ]
Starting postfix: [ OK ]
Stopping saslauthd: [ OK ]
Starting saslauthd: [ OK ]
Shutting down Mail Virus Scanner (amavisd): [ OK ]
Starting Mail Virus Scanner (amavisd): [ OK ]
Stopping Clam AntiVirus Daemon: [ OK ]
Starting Clam AntiVirus Daemon: [ OK ]
Stopping Courier authentication services: authdaemond
Starting Courier authentication services: authdaemond
Stopping Courier-IMAP server: imap imap-ssl pop3 pop3-ssl
Starting Courier-IMAP server: imap imap-ssl pop3 pop3-ssl
Stopping httpd: [ OK ]
Starting httpd: [ OK ]
Stopping pure-ftpd: [ OK ]
Starting pure-ftpd: [ OK ]
Installation completed.
之后,你就可以通过http://server1.example.com:8080/ or http://192.168.0.100:8080/,用户名和密码都admin来登录后台了。
后台登录界面: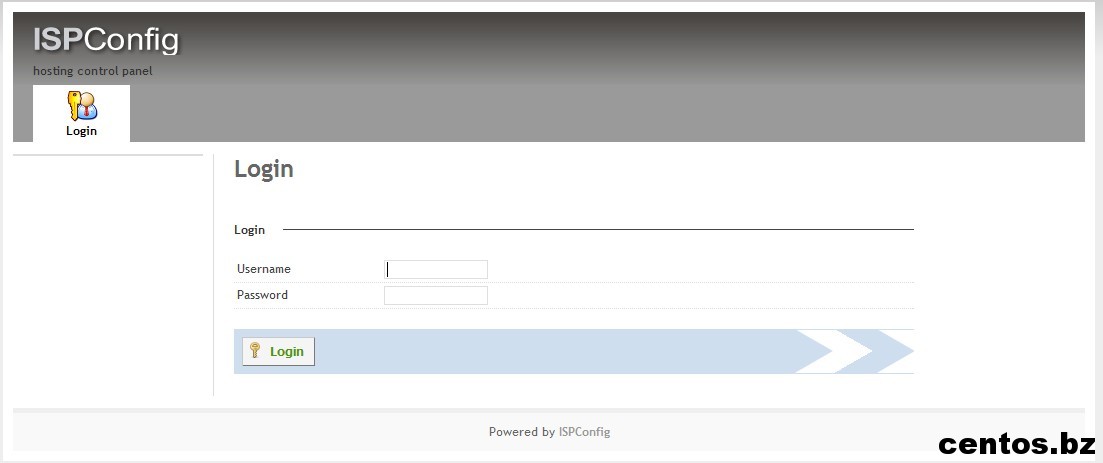
Administartor后台界面:
Reseller后台界面:
Client后台界面:
ISPConfig后台演示地址:http://www.ispconfig.org/ispconfig-3/online-demo/
官方网站:http://www.ispconfig.org/
参考文章:http://www.howtoforge.com/perfect-server-centos-5.2-ispconfig-3
标签云
-
OfficePHPSnmpNFS监控KubernetesUbuntuAnsibleSwarmOpenStackKotlinDockerGolangCrontabFlaskLighttpdTcpdumpVirtualboxWindowsGIT缓存AndroidPostgreSQL代理服务器LUAMacOSsquidRedisVPSOpenrestyBashFirewalldTomcatIOSHAproxySystemdGoogleSwiftMariaDBMongodbSambaTensorFlowRedhatWordPressSQLAlchemyApacheCDNLinuxAppleDeepinCurlWPSOpenVZPostfixDNSCactiLVMMemcacheIptables备份PythonKVM容器JenkinsCentosSupervisorShellFlutterMySQLSSHInnoDBSecureCRTVirtualminYumSocketWiresharkKloxoVsftpdVagrantWgetPuttyRsync集群NginxSVNSaltStackZabbixiPhone部署Debian